Connect with us

News

Lips Sofa: A Bold and Iconic Furniture Design

Published

on

Lips Sofa: A Bold and Iconic Furniture Design

The lips sofa, often recognized for its striking shape and vibrant colors, is an iconic piece of furniture that merges art, design, and functionality. Inspired by surrealism and pop culture, the lips sofa has become a symbol of avant-garde interior decor, catching the attention of designers, artists, and homeowners alike. Its distinctiveness lies not just in its form but in the story behind its creation, its cultural significance, and its continued influence in modern interior design.

In this article, we will explore the history of the lips sofa, the design inspiration behind it, its cultural relevance, and how it has evolved over time. We will also discuss its place in contemporary design and the role it plays in modern homes, offices, and public spaces. Additionally, we will delve into the symbolism it holds, its popularity in different parts of the world, and how to incorporate it into various interior styles.

The History of the Lips Sofa

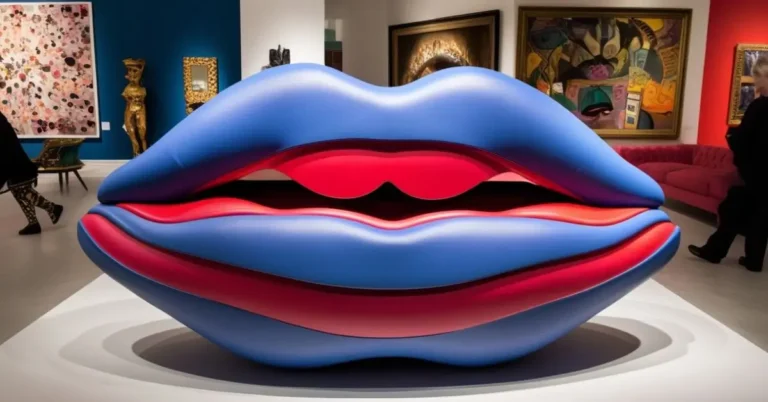
The lips sofa was first brought to life in the 1930s as part of the surrealist movement, which sought to challenge conventional perceptions of reality. The most famous and earliest rendition of this design is the “Mae West Lips Sofa,” designed by the legendary Spanish surrealist artist Salvador Dalí. Dalí was inspired by the sensuality of the actress Mae West and her iconic lips, which became the focal point for this extraordinary piece of furniture. The sofa was not just a piece of seating but a bold statement that embodied the eccentric and imaginative essence of surrealism.

Dalí’s lips sofa was part of a broader effort to create pieces that were functional but also artistic, blurring the lines between art and everyday objects. His approach to the lips sofa epitomized the surrealist ideal of taking familiar objects and presenting them in a way that would evoke new, often disorienting, associations.

While Dalí’s original sofa was intended as an art piece rather than a mass-market item, it laid the groundwork for the future of bold, unconventional furniture designs. Throughout the decades, variations of the lips sofa have been produced by several designers, making it a timeless symbol of creativity and individualism in furniture design.

Design Inspiration: Surrealism Meets Pop Art

The lips sofa draws inspiration from a variety of artistic movements, including surrealism and pop art. Salvador Dalí, the mastermind behind the original design, was a pivotal figure in surrealism, a movement that aimed to bridge the gap between the unconscious mind and reality. By designing a sofa in the shape of human lips, Dalí challenged the traditional notion of what a sofa could or should be.

The design of the lips sofa has evolved over time, especially as the pop art movement gained momentum in the 1950s and 1960s. Pop art, characterized by bold colors, playful shapes, and references to popular culture, was a natural extension of surrealism’s challenge to artistic norms. The lips sofa’s striking form and use of bold red, pink, or other vibrant colors made it an ideal piece to align with pop art’s embrace of everyday objects as art.

The lips sofa’s strong association with sensuality and the human body also taps into the themes of eroticism and glamour, particularly in the Hollywood film industry, which has always been a major influence on art and design. The interplay between surrealist elements, bold forms, and pop culture imagery solidified the lips sofa’s position as a design icon.

Cultural Significance of the Lips Sofa

The lips sofa holds cultural significance far beyond the world of interior design. It is a symbol of boldness, artistic freedom, and a celebration of human sensuality. The sofa represents the merging of art and life, where functional items are no longer just functional—they become statements of personality and creativity.

In popular culture, the lips sofa has been featured in countless movies, music videos, fashion shoots, and advertisements, further embedding it in the public consciousness. Its sensuous shape makes it an ideal representation of romanticism and elegance, particularly in settings that aim to evoke feelings of luxury and sophistication.

The lips sofa has also become a cultural symbol in feminist art. By using a representation of female lips, a traditionally sexualized body part, as the shape for a functional object, the design can be seen as both a playful and subversive take on traditional gender roles. While it embodies sensuality, it also presents a reclaiming of the female form in a way that empowers rather than objectifies.

Evolution of the Lips Sofa in Contemporary Design

Over the years, the lips sofa has evolved into different styles, materials, and color schemes, making it adaptable to various interior design trends. While the original designs were largely crafted in bold reds and bright hues, modern iterations of the lips sofa come in more subdued colors like black, white, and pastel tones, offering versatility for a wide range of aesthetic preferences.

Designers have also experimented with different materials. The traditional velvet or fabric upholstery has expanded to include leather, faux fur, and even metallic finishes, giving the lips sofa a contemporary twist. The evolution of this sofa has made it suitable for not only eclectic and modern interiors but also more minimalistic and industrial spaces, demonstrating its enduring appeal.

While it remains a popular choice for art collectors and avant-garde enthusiasts, the lips sofa is also being embraced by younger generations who appreciate its playful, whimsical nature. It is frequently seen in modern living rooms, boutique hotels, and high-fashion retail spaces. This versatility ensures that the lips sofa remains relevant even in today’s fast-changing design world.

Symbolism of the Lips Sofa

The lips sofa carries rich symbolic meaning. At its core, the design is playful and provocative, reflecting the sensuality associated with lips and human expression. Lips, after all, are central to communication and emotion, playing a key role in how people convey love, affection, and desire.

In some interpretations, the lips sofa can be seen as a form of artistic rebellion, challenging the convention that furniture should be neutral and functional. It defies the notion of bland, utilitarian design by offering a piece that is both functional and full of character. For those who choose to incorporate the lips sofa into their decor, it often represents a desire to break free from traditional boundaries and embrace bold self-expression.

In contemporary culture, where individuality and uniqueness are celebrated more than ever, the lips sofa has come to symbolize nonconformity. It stands as a bold statement for those who are not afraid to embrace the unconventional and express their personalities through their surroundings.

Popularity Around the World

The lips sofa has transcended its European surrealist roots to gain popularity worldwide. In North America, it became especially popular during the pop art movement, where its vibrant design fit perfectly into the colorful, kitschy aesthetic that defined mid-century modernism. Over time, its influence spread globally, with versions of the sofa making appearances in the homes of celebrities, high-end fashion brands, and art galleries.

In Europe, the lips sofa remains a staple in eclectic and avant-garde design. It is particularly popular in cities with strong design cultures, such as Milan, Paris, and Barcelona, where modern art continues to thrive. In Asia, where bold, contemporary designs have gained increasing recognition, the lips sofa has found a home in luxury hotels, creative offices, and high-end residential interiors.

The global appeal of the lips sofa is a testament to its timeless design, transcending cultural and geographic boundaries. Whether as a piece of functional art or a statement piece in a living room, the lips sofa continues to attract attention from diverse audiences around the world.

Incorporating the Lips Sofa into Modern Interiors

Incorporating a lips sofa into a modern interior can be a bold design move, adding a focal point and a touch of artistic flair. The key to successfully integrating the sofa is balancing its vibrant and distinctive form with other elements in the room.

  1. Minimalist Spaces: In minimalist spaces, where the color palette is often neutral, the lips sofa can serve as a striking accent piece. Pairing it with clean lines, neutral walls, and sleek furnishings allows the sofa to stand out without overwhelming the space.
  2. Eclectic Interiors: For those who prefer eclectic designs, the lips sofa can blend seamlessly with a mix of patterns, textures, and other bold furniture pieces. Its whimsical design complements vintage items, bold artworks, and vibrant textiles.
  3. Luxury Living Rooms: In luxury settings, such as high-end homes or boutique hotels, the lips sofa adds an element of playfulness to an otherwise sophisticated space. Upholstered in luxe materials like velvet or leather, it exudes elegance while maintaining its artistic roots.
  4. Creative Workspaces: The lips sofa is also an excellent choice for creative offices, design studios, and gallery spaces. Its bold shape can inspire creativity and serve as a conversation piece for clients and collaborators.
  5. Outdoor Lounges: Some versions of the lips sofa are designed for outdoor use, making them ideal for chic rooftop lounges or garden seating areas. Made with weather-resistant materials, they offer a playful touch to outdoor spaces while still being practical.

Conclusion

The lips sofa is more than just a piece of furniture—it is a work of art, a cultural statement, and a design icon. Its origins in surrealism and its evolution through pop art have made it a timeless piece that continues to inspire and captivate. With its bold form, rich symbolism, and global appeal, the lips sofa transcends mere functionality, offering those who choose it an opportunity to express their creativity and personality through their interior design.

Whether in a minimalist apartment, a luxurious living room, or an eclectic office space, the lips sofa remains a statement of individuality and artistic expression. Its place in design history is secure, and its influence continues to be felt across the world of art and interior design.

Continue Reading
Click to comment

Leave a Reply

Your email address will not be published. Required fields are marked *

News

How to Cure Gum Disease Without a Dentist: Natural Remedies and Home Treatments

Published

on

How to Cure Gum Disease Without a Dentist: Natural Remedies and Home Treatments

Gum disease, also known as periodontal disease, is a common oral health problem that affects millions of people worldwide. Characterized by inflammation of the gums, this condition can progress into more severe stages, eventually leading to tooth loss if untreated. While visiting a dentist is the most effective way to diagnose and treat gum disease, there are natural remedies and lifestyle changes that may help manage and, in some cases, even reverse early stages of gum disease from the comfort of your home.

This article will explore ways to cure gum disease without a dentist, focusing on natural remedies, diet, oral hygiene, and lifestyle habits. Although these methods may alleviate symptoms or slow the progression of gum disease, it’s essential to consult a healthcare professional if the condition worsens or does not improve.

Understanding Gum Disease

Gum disease begins with the accumulation of plaque, a sticky film of bacteria that forms on teeth. When plaque is not removed by regular brushing and flossing, it hardens into tartar, which leads to irritation and inflammation of the gums. Gum disease is generally classified into two stages:

  1. Gingivitis: The mildest form of gum disease, characterized by red, swollen gums that may bleed during brushing or flossing. Gingivitis is reversible with good oral hygiene and proper care.
  2. Periodontitis: The advanced stage of gum disease, where the inflammation spreads below the gumline, leading to bone and tissue loss. Periodontitis requires professional treatment and can result in tooth loss if not properly managed.

Symptoms of gum disease include swollen, red, or tender gums, persistent bad breath, receding gums, and loose teeth. Identifying these symptoms early on and taking appropriate action can help stop the progression of gum disease.

Causes of Gum Disease

Several factors contribute to the development of gum disease, including:

  • Poor Oral Hygiene: Irregular brushing and flossing allow plaque to accumulate, increasing the risk of gum disease.
  • Smoking or Tobacco Use: Smoking impairs the immune system, making it harder for the body to fight off gum infections.
  • Genetics: A family history of gum disease increases the likelihood of developing the condition.
  • Hormonal Changes: Pregnancy, menstruation, and menopause can make gums more sensitive, increasing the risk of gum disease.
  • Medications: Certain medications, such as antidepressants, antihistamines, and blood pressure drugs, can reduce saliva production, leading to dry mouth and gum disease.
  • Chronic Conditions: Diseases like diabetes and autoimmune disorders can make individuals more susceptible to gum infections.

Understanding these risk factors helps in addressing the root causes of gum disease and implementing preventive measures.

Natural Remedies to Cure Gum Disease

While professional dental care is recommended for severe gum disease, the following natural remedies can help manage mild forms like gingivitis and prevent the condition from worsening.

1. Oil Pulling

Oil pulling is an ancient Ayurvedic practice that involves swishing oil (typically coconut oil) in your mouth for 10 to 20 minutes. This practice helps remove toxins, bacteria, and plaque from the mouth.

  • How to Use: Swish one tablespoon of coconut oil in your mouth for 15-20 minutes. Spit it out and rinse your mouth with warm water. Brush your teeth afterward. Perform this daily for the best results.

Coconut oil contains lauric acid, known for its anti-inflammatory and antimicrobial properties, making it effective in fighting the bacteria responsible for gum disease.

2. Saltwater Rinse

A saltwater rinse is a simple and effective remedy for reducing gum inflammation and killing bacteria. Salt is a natural disinfectant that can help soothe irritated gums and promote healing.

  • How to Use: Dissolve ½ teaspoon of salt in a glass of warm water. Swish the solution in your mouth for 30 seconds and spit it out. Repeat this process two to three times a day.

The saltwater rinse helps reduce swelling and flush out bacteria from the gum pockets, which can prevent the progression of gum disease.

3. Aloe Vera

Aloe vera is known for its soothing and anti-inflammatory properties, making it a useful remedy for gum disease. It can help reduce gum inflammation and promote tissue regeneration.

  • How to Use: Apply pure aloe vera gel directly to the gums and leave it on for a few minutes. Rinse your mouth with water afterward. Repeat this process twice a day for optimal results.

Aloe vera can also be used as a mouthwash by mixing its gel with water and swishing it around in the mouth.

4. Tea Tree Oil

Tea tree oil is a powerful antimicrobial agent that can help combat bacteria in the mouth. It has been found to reduce bleeding and inflammation in individuals with gum disease.

  • How to Use: Add a few drops of tea tree oil to your toothpaste or dilute it with water and use it as a mouthwash. Be cautious not to swallow the oil, as it can be toxic if ingested.

Tea tree oil’s antibacterial properties can help reduce plaque buildup and prevent the progression of gum disease.

5. Turmeric

Turmeric contains curcumin, a compound with anti-inflammatory and antioxidant properties. It has been shown to reduce plaque, gingivitis, and bacteria when used as part of an oral care routine.

  • How to Use: Make a paste using ½ teaspoon of turmeric powder and water. Apply the paste to your gums, let it sit for 10 minutes, then rinse your mouth with water. Do this once or twice a day for the best results.

Turmeric helps reduce inflammation and bacterial growth, making it a valuable tool in treating gum disease.

6. Green Tea

Green tea is rich in antioxidants, particularly catechins, which help reduce inflammation and fight bacteria. Studies have shown that drinking green tea regularly can improve gum health and reduce the severity of gum disease.

  • How to Use: Drink one or two cups of green tea daily or use cooled green tea as a mouth rinse to benefit from its antimicrobial properties.

The antioxidants in green tea help strengthen the immune system and prevent the progression of gum disease.

Maintaining Proper Oral Hygiene at Home

Consistent oral hygiene practices are crucial for preventing and managing gum disease. While natural remedies can help, maintaining a proper oral care routine is essential for long-term gum health.

1. Brush Your Teeth Twice a Day

Brushing your teeth twice daily with fluoride toothpaste helps remove plaque and bacteria that contribute to gum disease. Use a soft-bristled toothbrush and gently brush in circular motions along the gumline to avoid damaging the gums.

2. Floss Daily

Flossing helps remove food particles and plaque from between the teeth and along the gumline. Daily flossing is essential for preventing gum disease, as brushing alone cannot reach these areas.

3. Use a Mouthwash

An antimicrobial mouthwash can help kill bacteria that brushing and flossing may miss. Look for a mouthwash that is specifically designed for gum health or contains natural antibacterial agents like tea tree oil.

4. Use an Interdental Brush

An interdental brush is a small brush designed to clean between the teeth. It is particularly effective for individuals with gum disease, as it can reach areas that floss may not.

5. Stay Hydrated

Drinking water throughout the day helps rinse away food particles and bacteria, keeping your mouth clean. Proper hydration also promotes saliva production, which is essential for maintaining a healthy mouth and neutralizing harmful bacteria.

Diet and Lifestyle Changes to Prevent Gum Disease

A healthy diet and lifestyle play a significant role in preventing and managing gum disease. Incorporating the following changes can help improve your oral health and overall well-being.

1. Eat a Balanced Diet

A diet rich in vitamins and minerals supports gum health. Include foods that are high in calcium, vitamin C, and omega-3 fatty acids, as they promote strong teeth and gums. Leafy greens, fruits, nuts, seeds, and fatty fish are excellent choices.

2. Avoid Sugary Foods and Drinks

Sugary foods and drinks contribute to plaque formation, increasing the risk of gum disease. Minimize your consumption of sweets, sodas, and processed foods to protect your gums.

3. Quit Smoking

Smoking is a leading cause of gum disease, as it weakens the immune system and reduces blood flow to the gums. Quitting smoking improves your ability to fight off gum infections and promotes overall gum health.

4. Manage Stress

Chronic stress weakens the immune system, making it harder for the body to fight off infections, including gum disease. Practicing stress-relief techniques such as meditation, deep breathing, or exercise can help improve your gum health.

5. Limit Alcohol Consumption

Excessive alcohol consumption can dry out the mouth, reducing saliva production and increasing the risk of gum disease. Drink alcohol in moderation and stay hydrated to maintain a healthy mouth.

When to See a Dentist

While these natural remedies and lifestyle changes can help manage gum disease, it’s important to seek professional care if:

  • Your symptoms persist or worsen despite home treatments.
  • You experience severe gum pain or bleeding.
  • Your gums begin to recede or your teeth become loose.

A dentist can provide deep cleaning treatments, prescribe medications, or perform surgeries if necessary. Early intervention is key to preventing long-term damage to your gums and teeth.

Conclusion

Gum disease is a common but preventable condition that can be managed with proper oral hygiene, natural remedies, and lifestyle changes. While it’s possible to alleviate early symptoms of gum disease without visiting a dentist, regular dental checkups remain essential for maintaining overall oral health. By incorporating practices like oil pulling, saltwater rinses, and maintaining a healthy diet, you can protect your gums and prevent the progression of gum disease.

Remember, gum disease doesn’t have to lead to tooth loss. With a proactive approach to oral care and natural remedies, you can keep your gums healthy and enjoy a lifetime of strong, beautiful teeth.

Continue Reading

News

How to Draw a Bow: A Step-by-Step Guide for Beginners

Published

on

How to Draw a Bow: A Step-by-Step Guide for Beginners

Drawing is an amazing way to express creativity, and whether you’re sketching an archer in action or simply designing the bow as a standalone piece, learning how to draw a bow is a fun and rewarding exercise. Bows are iconic objects tied to archery, hunting, and fantasy worlds, and they have been depicted throughout history in various forms of art. In this guide, we will walk you through the steps of drawing a bow, starting from the basics to more advanced techniques to bring the bow to life on your canvas.

Understanding the Structure of a Bow

Before jumping into the drawing, it’s essential to understand the basic parts of a bow. This knowledge will help you depict the object more accurately and ensure that your drawing has realistic proportions. A traditional bow consists of several key components:

  • Riser: The central part of the bow that holds everything together.
  • Limbs: The flexible upper and lower arms of the bow that bend when the bow is drawn.
  • String: The taut cord that runs from one end of the bow to the other and is pulled back when drawing the bow.
  • Nocking Point: The place where the arrow rests on the string.
  • Grip: The area on the riser where the archer holds the bow.

Modern bows, such as compound bows, have additional components like cams and pulleys, but for simplicity, we will focus on the traditional bow.

Materials Needed for Drawing a Bow

To get started with drawing a bow, make sure you have the right materials. You don’t need expensive or advanced tools to create a great drawing.

Basic Materials:

  • Pencils (ranging from H to B for different shading effects)
  • Eraser (for correcting mistakes)
  • Sketchpad or drawing paper
  • Ruler (optional, for precision)

You may also want to use colored pencils or markers if you want to add color to your final piece.

Step-by-Step Instructions on Drawing a Bow

Step 1: Drawing the Bow’s Outline

Begin by sketching the basic shape of the bow. Since most bows are symmetrical, it’s helpful to start by drawing a straight line down the middle of your paper to serve as a guide for symmetry. This line represents the central axis where the riser and limbs will be aligned.

  • Draw a slightly curved line on either side of the central axis to represent the limbs. The curve should be gentle, mimicking the bend in a traditional bow.
  • Connect these curves at the bottom and top with a slight arc to create the basic frame of the bow.

Step 2: Shaping the Limbs

Now that the basic outline is drawn, it’s time to give more definition to the limbs. The limbs are the longest parts of the bow, so be sure they are evenly proportioned.

  • Thicken the curved lines by drawing parallel lines just outside the original curves, creating a more substantial bow structure.
  • Remember that the limbs taper toward the ends where they connect with the string. As you move closer to the tips of the bow, the limbs should gradually become thinner.

Step 3: Adding the Riser and Grip

The riser is the middle section of the bow, where the archer grips the bow. It usually has a distinct shape and can be either straight or slightly contoured, depending on the type of bow you’re drawing.

  • Draw the riser by adding a more pronounced curve or oval shape at the center of the bow’s outline.
  • Add the grip near the bottom of the riser. You can indicate the grip by sketching some subtle detailing lines that represent where the archer’s hand would hold the bow.

Step 4: Drawing the Bowstring

The string is one of the defining features of the bow, and it is important to draw it in a way that it looks tight and under tension.

  • Start by drawing a line from the top tip of the bow to the bottom tip, keeping the string aligned with the central axis.
  • Make sure the string is straight and taut—this will make your bow look realistic.
  • If you want to depict the bow as if it’s being drawn, adjust the curve of the string accordingly to show tension, as though it is being pulled back by the archer.

Step 5: Adding the Nocking Point and Arrow Rest

The nocking point and arrow rest are small details that can make your drawing more accurate.

  • The nocking point is typically located a bit above the center of the bowstring. To represent this, draw a small mark or notch where the arrow would be placed.
  • You can also add a tiny platform on the riser to represent the arrow rest, which is where the arrow lies when the bow is ready to shoot.

Step 6: Adding Details and Texture

Now that the basic structure of the bow is complete, it’s time to add more details that will give your drawing depth and realism.

  • Draw any textures that might be present on the grip, such as leather wrapping or grooves for finger placement.
  • Add wood grain textures to the limbs of the bow. This can be done by drawing faint, wavy lines that follow the natural curve of the limbs.
  • If you are drawing a modern compound bow, you can also add the cams, pulleys, and other mechanical details at the ends of the limbs.

Step 7: Shading and Lighting

Shading is what brings your drawing to life, adding depth and realism. Decide where your light source is coming from, and shade accordingly.

  • Use a softer pencil (such as a 2B or 4B) to add shadows on the opposite side of the light source. The deepest shadows will be in areas where the limbs curve or under the riser.
  • Use a harder pencil (such as an H) to add light shading to other parts of the bow, creating smooth transitions between light and dark areas.
  • You can use an eraser to add highlights, especially on the edges of the limbs where the light would naturally hit.

Step 8: Drawing the Arrow (Optional)

If you want to add an arrow to your drawing, it can be a great way to enhance the overall composition.

  • Begin by drawing a straight, thin line extending from the nocking point on the string.
  • Draw the arrowhead at one end, which can be a simple triangle or more intricate depending on the style of bow and arrow you are drawing.
  • Add fletching (feathers) to the other end of the arrow. The fletching usually consists of three or four feathers, each curving slightly in the same direction.

Adding Color to Your Bow Drawing (Optional)

Coloring your drawing can add another layer of depth and creativity. You can choose to go for a realistic approach, using colors like brown and beige for wooden bows, or you can experiment with bold colors for a more fantasy or modern look.

  • For a traditional wooden bow, use shades of brown for the limbs and riser. Add darker brown for the shadows and lighter shades for the highlights.
  • For the string, a dark grey or black color works well, while the arrow can be colored with metallic shades for the arrowhead and earthy tones for the feathers.

If you are going for a more modern, high-tech bow, such as a compound bow, you can experiment with metallic shades, bright accents, or even camouflage patterns.

Tips for Drawing a Bow

Here are some additional tips to help you perfect your drawing:

  • Practice symmetry: Since a bow is symmetrical, it’s important to keep both sides of the bow even. Using a ruler or guidelines can help with this.
  • Observe real bows: Look at pictures or real-life bows to understand how they are constructed. This can give you ideas for details and textures.
  • Experiment with styles: You can choose to draw different types of bows, from simple traditional ones to more elaborate compound bows or fantasy-inspired designs.

Common Mistakes to Avoid When Drawing a Bow

Even with careful attention, some mistakes can occur when drawing a bow. Here are a few common pitfalls and how to avoid them:

  • Overcomplicating the bow’s design: If you’re a beginner, it’s best to start with a simple design and add details as you gain more confidence.
  • Unnatural curves: A bow’s limbs curve naturally, but some beginners draw them too rigid or exaggerated. Use references to get the curves right.
  • Incorrect proportions: The limbs, riser, and string should be proportioned correctly. If the riser is too long or the limbs are too short, the bow might look unrealistic.

Conclusion

Drawing a bow can be a fulfilling artistic challenge, whether you’re aiming for realism or a stylized version of this classic weapon. With practice, attention to detail, and a good understanding of the bow’s structure, you can create stunning illustrations of bows for various purposes—from fantasy art to sports equipment design. Remember, the key is to practice and have fun with the process. Over time, your skills will improve, and you’ll be able to draw more complex and detailed bows with ease.

Whether you’re using traditional pencils or digital drawing tools, the method remains the same: start with the basic shapes, build the details, and finish with shading and texture. With this guide, you’re well on your way to mastering the art of drawing a bow.

Continue Reading

News

Teacherease: A Comprehensive Guide to Modern Education Management

Published

on

Teacherease: A Comprehensive Guide to Modern Education Management

In today’s ever-evolving educational landscape, technology plays an indispensable role in managing and delivering quality education. One such educational tool that has garnered widespread adoption is TeacherEase, a web-based platform designed to simplify the complex processes of school management and enhance the learning experience. This comprehensive solution offers functionalities that address the needs of teachers, administrators, students, and parents.

This article delves into the core features, benefits, challenges, and impact of TeacherEase on modern education management, while also exploring how it aligns with contemporary educational trends.

The Need for Education Management Systems

Education has undergone significant transformation in recent decades, with a greater focus on accountability, data-driven decision-making, and personalized learning. In response to these shifts, schools and districts have turned to Education Management Systems (EMS) to handle various administrative tasks, instructional planning, and student performance tracking.

Traditionally, teachers, school administrators, and parents faced cumbersome processes for grading, communication, attendance, and managing student information. The manual handling of these operations was prone to errors and consumed valuable time that could otherwise be devoted to enhancing the quality of education. TeacherEase seeks to overcome these obstacles by digitizing and streamlining these tasks.

What is TeacherEase?

TeacherEase is an innovative software solution specifically designed for educators, parents, and students. It is part of the SchoolInsight system developed by Common Goal Systems, a company known for offering modern cloud-based solutions for school districts. The platform provides educators with easy-to-use tools for student information management, lesson planning, grading, and communication with stakeholders. Its functionality is aligned with the needs of K-12 schools, with an emphasis on standards-based learning.

Whether it is tracking student progress, maintaining records, or facilitating parent-teacher communication, TeacherEase simplifies the entire spectrum of education management.

Key Features of TeacherEase

1. Gradebook Management

One of TeacherEase’s standout features is its comprehensive gradebook, designed to support standards-based grading (SBG). Unlike traditional grading systems that focus on overall scores and averages, TeacherEase enables teachers to assess individual student performance based on specific learning standards. This allows educators to provide more detailed feedback on student strengths and areas for improvement.

Teachers can create assignments, quizzes, and tests, and assign them directly through the platform. The gradebook automatically updates student grades and provides real-time reporting to both teachers and parents. This transparency promotes better understanding of student progress and areas where intervention may be needed.

2. Lesson Planning

Another key feature is TeacherEase’s ability to streamline lesson planning. Teachers can develop lesson plans based on learning standards, set objectives, and include activities, resources, and assessments. The platform allows educators to organize their lessons into units, and share resources with other teachers within the school or district.

Furthermore, lesson plans can be linked directly to the gradebook, ensuring alignment between instructional goals and student assessments. The lesson planning tool fosters collaboration and consistency among teachers, enabling a cohesive learning experience for students.

3. Attendance Tracking

Attendance management is a fundamental aspect of school administration, and TeacherEase simplifies this task with an intuitive interface that allows teachers to record attendance in real-time. Administrators can easily access attendance reports and track patterns of absenteeism. This data helps schools intervene in cases of chronic absenteeism, ensuring no student falls through the cracks.

Parents also benefit from this feature, as they receive notifications if their child is marked absent or tardy, fostering accountability and promoting better attendance behavior among students.

4. Parent and Student Portals

TeacherEase provides dedicated portals for both parents and students, ensuring easy access to essential information. The parent portal allows parents to track their child’s progress, view grades, attendance, and upcoming assignments. This level of transparency strengthens the parent-teacher partnership, helping parents stay engaged in their child’s education.

Students also have their own portal, which helps them manage assignments, view feedback from teachers, and monitor their own performance. This promotes a sense of ownership over their learning and encourages self-directed progress.

5. Communication Tools

Effective communication between teachers, administrators, and parents is critical for student success. TeacherEase includes built-in communication tools that allow teachers to send messages, notifications, and updates to parents and students. This feature reduces the need for manual communication via phone calls or emails, saving time and ensuring that important information is conveyed in a timely manner.

Teachers can communicate directly through the platform for events such as parent-teacher conferences, grade updates, and school activities. The platform fosters ongoing dialogue, creating a strong support network for students.

6. Reporting and Analytics

In an era where data-driven decision-making is emphasized, TeacherEase excels by offering robust reporting and analytics tools. Educators and administrators can generate detailed reports on student progress, attendance trends, and assessment outcomes. This data is instrumental in identifying areas where interventions are needed, assessing instructional efficacy, and informing school improvement plans.

Moreover, the analytics provided by TeacherEase are visual and easy to interpret, allowing schools to identify trends and patterns without the need for extensive data analysis expertise.

The Benefits of TeacherEase

1. Efficiency and Time Savings

One of the primary advantages of TeacherEase is the efficiency it brings to school operations. Administrative tasks such as grading, attendance tracking, and lesson planning are simplified and automated, freeing up time for teachers to focus on instruction and student engagement. With the reduction of paperwork and manual processes, educators can devote more attention to improving student outcomes.

2. Improved Collaboration

TeacherEase fosters collaboration among educators within a school or district. The platform allows teachers to share lesson plans, resources, and instructional strategies, enabling them to work together to create a more cohesive and effective learning environment. Collaboration also extends to parents, who gain better insight into their child’s education and can work in partnership with teachers to support learning at home.

3. Enhanced Student Engagement

By giving students access to their own portals, TeacherEase empowers students to take an active role in their education. They can track their assignments, receive feedback, and monitor their own progress, which encourages a more self-directed approach to learning. The transparency of the platform helps students stay organized and motivated, as they have a clear understanding of their academic standing at all times.

4. Personalized Learning

The standards-based grading system used by TeacherEase allows teachers to tailor instruction to the needs of individual students. Teachers can identify which specific skills or concepts a student is struggling with and provide targeted interventions. This personalized approach to education helps ensure that no student is left behind, regardless of their learning pace or style.

5. Transparency and Accountability

The real-time access to student performance data provided by TeacherEase ensures that all stakeholders—teachers, students, and parents—are informed and accountable. Parents can easily monitor their child’s progress, attendance, and behavior, while students are held responsible for completing assignments and meeting expectations.

6. Data-Driven Decision Making

The reporting and analytics tools offered by TeacherEase are invaluable for making data-driven decisions. Schools can use the insights provided by the platform to assess the effectiveness of instructional strategies, identify areas for improvement, and allocate resources more effectively. This results in a more efficient and successful learning environment.

Challenges and Limitations

While TeacherEase offers numerous advantages, it is not without challenges. One concern is the potential for over-reliance on technology. Teachers, parents, and students may become dependent on the platform, which could detract from the personal interactions that are essential in education. Moreover, not all schools have the technological infrastructure or resources to implement a comprehensive EMS like TeacherEase.

Additionally, like any software solution, TeacherEase requires ongoing training and support to ensure that all users are familiar with its features and capabilities. Schools must invest in professional development to maximize the platform’s potential, which may present a barrier for some institutions.

The Future of TeacherEase in Education

As education continues to evolve, platforms like TeacherEase are likely to play an increasingly important role. The move towards data-driven instruction, personalized learning, and increased accountability aligns with the capabilities of TeacherEase, making it a valuable tool for schools aiming to modernize their operations.

Moreover, the ongoing development of artificial intelligence (AI) and machine learning (ML) technologies could further enhance TeacherEase’s ability to provide predictive analytics, personalized interventions, and adaptive learning pathways for students. The platform’s flexibility and ability to adapt to changing educational needs ensure that it will remain relevant in the future.

Conclusion

TeacherEase is a powerful, comprehensive tool that addresses many of the challenges faced by modern schools. Its focus on standards-based learning, personalized instruction, and transparent communication makes it an invaluable resource for teachers, administrators, parents, and students. The platform’s efficiency, data-driven insights, and ease of use contribute to a better learning environment and improve educational outcomes.

As technology continues to shape the educational landscape, TeacherEase will undoubtedly continue to evolve, offering innovative solutions that keep pace with the demands of contemporary education. The future of education management lies in platforms like TeacherEase, which seamlessly integrate administrative tasks, instructional planning, and student engagement into a cohesive system designed to foster student success.

Continue Reading

Trending

Copyright © 2017 Zox News Theme. Theme by MVP Themes, powered by WordPress.